 Save to Pinterest
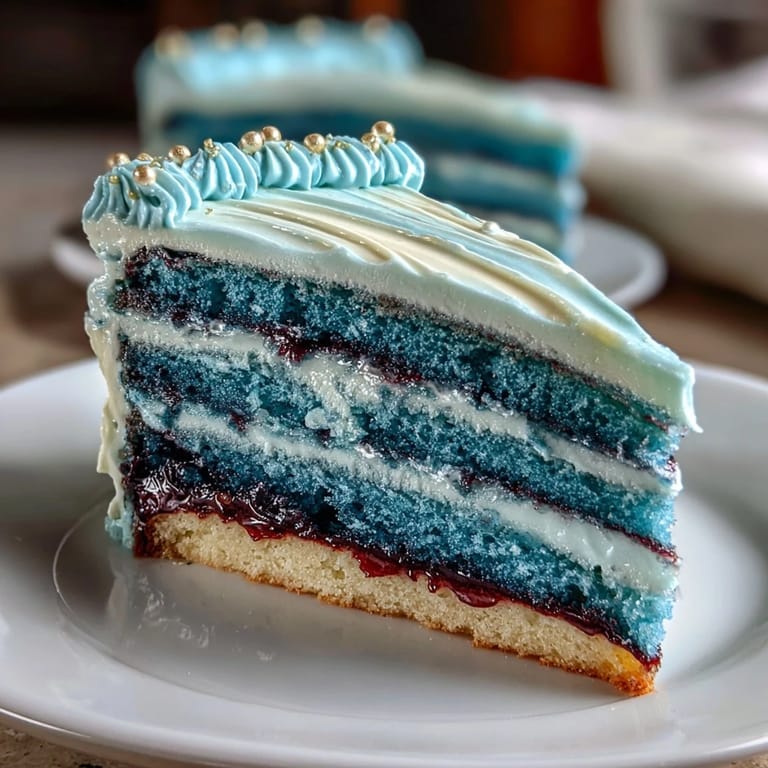
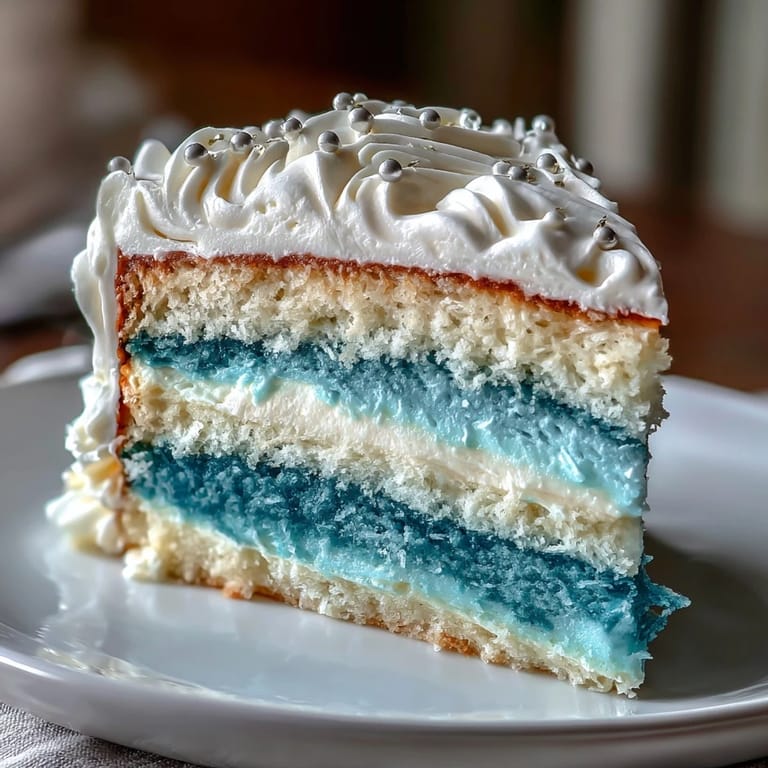
 My friend texted me three months before graduation asking if I could bake her cake, and honestly, I panicked a little. She wanted ombre layers in her school colors, something that would photograph well for her family's celebration dinner. I'd never attempted anything quite so deliberately elegant, but there was something about the challenge that felt right for marking such a big moment. So I dove in, mixing and tinting and stacking, learning as I went that this cake wasn't just about technique—it was about showing up for someone's milestone with your hands and patience and time.
I'll never forget opening her car door on graduation day and seeing her face light up when she caught sight of that cake in its box on the back seat. She pulled it out like it was made of spun glass, held it up to the afternoon light, and just stared at the color transition from deep blue to pale cream. That's when I realized the real magic wasn't the technical execution—it was knowing I'd made something that meant something to her, something that felt as important as the day itself.
Ingredients
- All-purpose flour (3 1/4 cups): This is your foundation, and measuring by weight matters more here than you'd think because you're dividing it across four batters and need them perfectly balanced.
- Baking powder (2 1/2 tsp): Don't skip the extra half teaspoon; it gives the layers a tender crumb that'll show off your color transitions instead of being dense and heavy.
- Salt (1/2 tsp): A quiet ingredient that makes the vanilla and butter sing while balancing the sweetness.
- Unsalted butter (1 cup): Room temperature is non-negotiable here—cold butter won't cream properly and you'll lose that light, fluffy texture.
- Granulated sugar (2 cups): The beating process is where the magic happens, so give yourself a full 3-4 minutes of mixing to incorporate air.
- Eggs (4 large, room temperature): Cold eggs can seize your batter, so plan ahead and let them sit out while you prep.
- Vanilla extract (1 tbsp): Use real vanilla, not imitation; the depth of flavor matters when everything else is showcasing those beautiful colors.
- Whole milk (1 1/4 cups, room temperature): This keeps the crumb tender and helps the batter divide smoothly into four equal parts.
- Gel food coloring: This is essential—liquid coloring will thin your batter and muddy your colors, so invest in a small set of gel colors in your chosen gradient shades.
- Egg whites (6 large): For Swiss meringue buttercream that's silky smooth and won't break when you add the butter.
- Unsalted butter for buttercream (1 1/2 cups): Cut into cubes and let it sit until it reaches that perfect soft-but-not-melting stage, or your buttercream will separate mid-mixing.
Tired of Takeout? 🥡
Get 10 meals you can make faster than delivery arrives. Seriously.
One email. No spam. Unsubscribe anytime.
Instructions
- Set up your pans and preheat:
- Preheat your oven to 350°F and get four 8-inch round pans lined with parchment—this matters because you're baking all four layers at once and need them to cook evenly. If you don't have four pans, you can bake in batches, though the flavor will be slightly more consistent if you bake them simultaneously.
- Mix your dry ingredients:
- Whisk together the flour, baking powder, and salt in a medium bowl; this aerates the flour and distributes the leavening evenly. Set it aside and take a breath—the next step is where things get exciting.
- Cream your butter and sugar:
- Beat softened butter and sugar together for about 3-4 minutes until the mixture looks pale and fluffy, like clouds. This is where you're incorporating air that'll make your layers tender, so don't rush it.
- Incorporate eggs one at a time:
- Add each egg individually and mix well after each addition; adding them all at once can make the batter look curdled, which affects the final texture. The emulsification process happens gradually, so patience here pays off.
- Add the vanilla and alternate wet and dry:
- Stir in your vanilla, then add the flour mixture and milk in three additions, starting and ending with flour. Mix gently until just combined—overmixing develops gluten and makes the cake dense, which is the opposite of what you want.
- Divide and tint your batter:
- Pour the batter evenly into four bowls and add gel coloring to each, creating a gradient from darkest to lightest. Use a toothpick to add color bit by bit; you can always add more but you can't take it out.
- Pour into pans and bake:
- Distribute each colored batter into its prepared pan and smooth the tops with an offset spatula. Bake for 22-25 minutes until a toothpick comes out clean, and you'll notice the kitchen smelling buttery and vanilla-sweet.
- Cool and prepare for buttercream:
- Let layers cool in pans for 10 minutes, then turn out onto wire racks to cool completely; this prevents condensation from making them soggy. Meanwhile, you can prep your buttercream.
- Heat your egg whites and sugar:
- Combine egg whites and sugar in a heatproof bowl set over simmering water, whisking constantly until the sugar dissolves and the mixture reaches 160°F. This step pasteurizes the eggs and creates a safe meringue base.
- Whip to stiff peaks:
- Transfer the warm mixture to a mixer and whip on high speed for about 10 minutes until stiff peaks form and the bowl feels cool to the touch. This takes longer than American buttercream but the texture is worth the wait.
- Add butter gradually:
- Add softened butter cubes a few at a time, mixing well between additions; if it looks broken or separated, keep going and it'll come back together. The transformation is almost magical once it emulsifies.
- Tint and assemble:
- Add vanilla and tint portions of buttercream to complement your cake layers if desired, then trim cake layers if needed and place the darkest on your cake stand. Spread buttercream between each layer, working from darkest to lightest for visual impact.
- Crumb coat and chill:
- Apply a thin layer of buttercream over the entire cake and chill for 20 minutes; this seals in any crumbs so your final coat looks pristine. This step takes discipline but the payoff is a professionally finished cake.
- Final frosting and decoration:
- Apply your final buttercream layer, blending colors if you want to enhance the ombre effect, then add pearls or toppers as desired. Chill until set and bring to room temperature before serving for the best flavor.
 Save to Pinterest
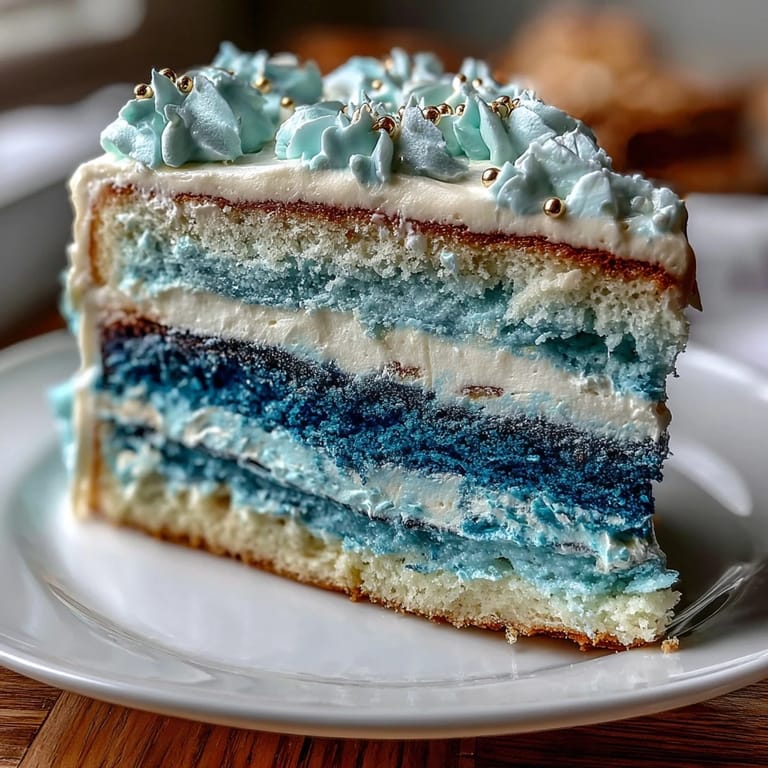
 What strikes me now, looking back, is that baking that cake taught me something about celebration that I didn't expect. It wasn't fancy or complicated, just four layers of color stacked with intention and care, and somehow that became the most memorable part of her graduation for people who tasted it. Sometimes showing up for someone means investing in the details, even when they can't see all the effort behind them.
Why Swiss Meringue Buttercream Changes Everything
The first time I made Swiss meringue buttercream, I was convinced I'd done something wrong because it separated and looked greasy halfway through. Then my mom told me to just keep mixing, and within another minute the whole thing came together into something so silky I couldn't believe I'd made it. That moment shifted how I think about cooking—sometimes you have to trust the process through the awkward middle part. Swiss meringue is less sweet than American buttercream and doesn't have that grainy texture that happens when powdered sugar gets mixed with butter, so it holds colors beautifully and actually tastes like a premium bakery version of itself.
The Ombre Trick That Actually Works
I learned the hard way that trying to create ombre by swirling colors together doesn't work—you end up with muddy brown instead of a clean gradient. The real trick is to divide your batter first, tint each portion separately with increasing amounts of gel coloring, then bake them all at once so each layer is a solid, distinct shade. When you stack them from darkest to lightest, the transition happens naturally and looks like you spent hours perfecting each shade when really you just did some simple math with food coloring.
Making This Cake Your Own
This cake is flexible enough that you can personalize it without losing the magic. I've seen versions with chocolate ombre by adding cocoa powder to the darker layers, versions with different color combinations to match whatever event you're celebrating, and even one version where someone filled the layers with buttercream in complementary colors for a surprise when you cut into it. The structure stays the same—four layers, Swiss meringue, careful decoration—but the personality can shift based on what matters to your celebration.
- If you want a chocolate ombre, replace some of the flour with cocoa powder in increasing amounts for each darker layer.
- Consider the occasion when choosing your color gradient; pastels feel celebratory while jewel tones feel more sophisticated.
- Edible pearls or gold dust take this cake from special occasion to absolutely stunning, and they're easier than you'd think to apply.
 Save to Pinterest
 There's something deeply satisfying about a cake that looks like you have years of training behind you, but really you just understood the system and followed it carefully. Bake this for someone you care about and watch their face when they see those perfect color layers emerge.
Recipe FAQs
- → How do I achieve the ombre effect in the layers?
Divide the batter equally into several bowls and add increasing amounts of gel food coloring to each. This creates a smooth gradient when baked and stacked.
- → What is Swiss meringue buttercream and how is it made?
Swiss meringue buttercream is a light, silky frosting made by heating egg whites and sugar over a water bath until dissolved, then whipping to stiff peaks before adding softened butter and vanilla.
- → Can I prepare this cake in advance?
Yes, the cake layers and buttercream can be made ahead. Assemble and decorate the cake shortly before serving, chilling it to set the buttercream if needed.
- → What tools are recommended for decorating this cake?
Use piping bags with decorative tips, offset spatulas for spreading, and optionally edible pearls or themed toppers to enhance the look.
- → Are there any allergen considerations?
This cake contains eggs, milk, wheat (gluten), and butter. Always check ingredient labels of food coloring and decorations for potential allergens.
- → How can I intensify the colors of the layers?
Use gel food coloring instead of liquid to achieve more vibrant and true colors without thinning the batter.