 Save to Pinterest
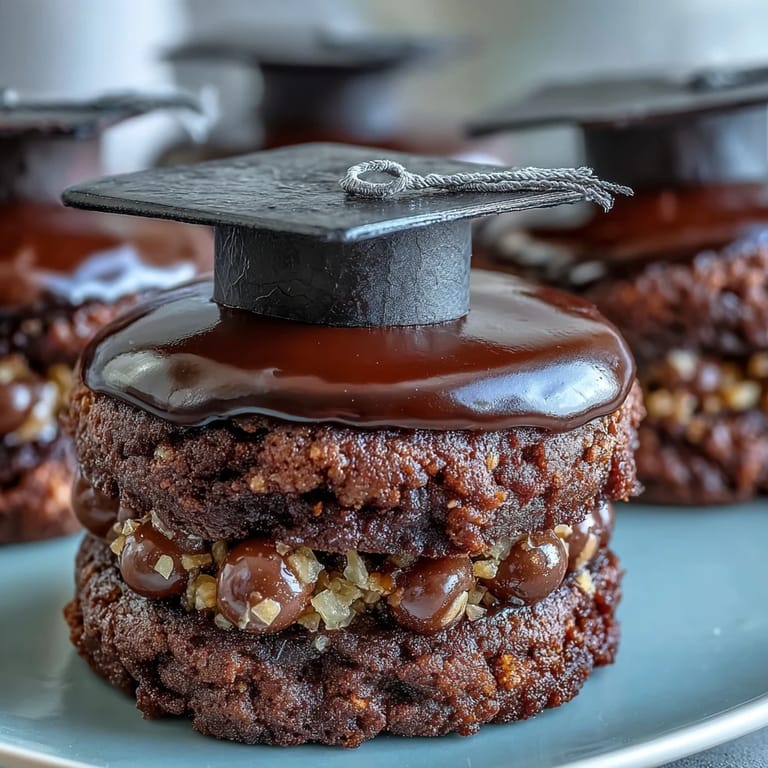
 My neighbor texted me a photo of her daughter's graduation cap and asked if I could bake something to match it. That's how these cookies came to life on a sunny afternoon when I had nothing but flour, butter, and a wild idea. The first batch turned out wonky—my royal icing was the consistency of pancake batter—but something clicked when I figured out the right water-to-sugar ratio. Now whenever I make them, I think of that moment in the kitchen, experimenting with squeeze bottles and toothpicks, trying to nail that perfect tassel.
I made a batch for my brother's graduation party, and watching his friends grab three or four cookies each told me everything I needed to know about whether they actually tasted good. Someone asked for the recipe before dessert was even finished, which felt like the highest compliment possible.
Ingredients
- All-purpose flour: The foundation of a crisp, buttery cookie that won't spread too thin or stay chewy in the middle.
- Unsalted butter: Softened butter is non-negotiable here—cold butter fights you during creaming and creates dense cookies.
- Granulated sugar: This gives you that subtle crunch and helps the cookies bake up with defined, golden edges.
- Egg and vanilla: Together they add richness and bind everything without making the dough taste one-dimensional.
- Powdered sugar: Sifted powdered sugar prevents lumps in royal icing, which would ruin your smooth piping lines.
- Egg whites: Raw egg whites stabilize and set beautifully, though meringue powder works if you're nervous about raw eggs.
- Gel food coloring: Gel is thicker than liquid food coloring, so you won't accidentally thin out your icing trying to get a dark black or bright yellow.
- Mini M&Ms or candy pearls: These tiny decorations become the tassel ends and add a pop of color that catches light.
Tired of Takeout? 🥡
Get 10 meals you can make faster than delivery arrives. Seriously.
One email. No spam. Unsubscribe anytime.
Instructions
- Mix the dry ingredients:
- Whisk flour, baking powder, and salt together in a bowl to distribute the leavening evenly. This prevents pockets of baking powder that would create weird texture bumps in your cookies.
- Cream butter and sugar:
- Beat them for a full two to three minutes until the mixture looks pale and slightly fluffy—this incorporates air that helps cookies bake up tender. If you rush this step, your cookies will taste dense and a little greasy.
- Bring the dough together:
- Add the egg and vanilla to your butter mixture, then gradually incorporate the flour blend, stirring just until no streaks of flour remain. Stop as soon as the dough comes together or your cookies will toughen up.
- Chill and prepare:
- Divide the dough into two disks, wrap them, and let them rest in the fridge for thirty minutes—this prevents the dough from spreading too much in the oven. While that's happening, preheat your oven to 350 degrees Fahrenheit.
- Roll and cut:
- Roll the chilled dough to a quarter-inch thickness on a lightly floured surface, then use a graduation cap or square cutter to create your shapes. Graduation cap cutters exist on the internet and are worth ordering because they're absolutely perfect for this project.
- Bake until golden:
- Bake for eight to ten minutes until just the edges turn golden brown—the centers should still look barely set because they'll continue cooking slightly on the hot pan. Pull them out before they look fully done, and they'll stay crispy instead of hard.
- Make royal icing:
- Beat egg whites until foamy, then gradually add sifted powdered sugar and beat for about five minutes until you see stiff, glossy peaks that hold their shape. Add vanilla at the end, then divide your icing and color it—most black for the caps, a little yellow for the tassels.
- Adjust icing consistency:
- Thinner icing (add a teaspoon of water at a time) flows smoothly for flooding the entire cookie, while thicker icing (add powdered sugar) holds shape better for piping details. Test it on parchment paper first because it's impossible to fix icing that's too thin once it's on the cookie.
- Outline and flood:
- Use a piping bag with a thin tip to outline each cookie with black icing, then fill the interior with slightly thinner black icing and use a toothpick to gently spread it to the edges. Let this set for thirty to sixty minutes so it firms up enough that you won't smudge it.
- Pipe the tassel:
- Once the black base is firm, pipe a small yellow line or loop on each cap with your yellow royal icing to represent the tassel. Crown it with a mini M&M or candy pearl that looks like the weight hanging from the end of a real graduation tassel.
- Let everything set:
- Royal icing needs several hours to fully harden, so let your finished cookies rest on the counter overnight before stacking or packaging them. This is perfect timing if you're baking them a day before an event.
 Save to Pinterest
 My friend's teenage daughter stood in my kitchen watching me decorate these and asked if she could help with the piping. By the time we finished, she'd claimed half of them as hers and insisted I teach her the technique. There's something unexpectedly sweet about cookies that spark conversations and draw people into the creative process.
The Science Behind the Crisp
Sugar cookies rely on the right balance of fat and flour to achieve that signature crisp texture without becoming hard as a rock. The butter provides richness, while the egg acts as a binder without adding so much moisture that the cookies turn cake-like. I learned this the hard way when I substituted applesauce for the egg once and ended up with sad, soft disks that nobody wanted to decorate.
Royal Icing Secrets
Royal icing intimidated me for years until I realized it's just egg whites, sugar, and patience. The key is understanding that it has two personalities—thin enough to flood and cover large areas, thick enough to pipe delicate details. Once you practice adjusting the consistency, you'll find yourself reaching for royal icing on all kinds of decorated treats, not just graduation caps.
Timeline and Prep Ahead
The beauty of these cookies is how forgiving they are for advance preparation, making them perfect when you're juggling event details and want one thing off your mind. You can bake the cookies two days in advance and store them in an airtight container, then decorate them the day before serving for maximum freshness and beauty.
- Bake your cookies early in the week and store them in an airtight container away from humidity.
- Mix your royal icing the day of decorating because egg whites are best used fresh.
- Decorated cookies last several days in an airtight container, so don't stress about timing decorating too close to the celebration.
 Save to Pinterest
 These cookies have become my go-to project for graduations, and now friends ask me to make them every spring. There's something about baking something that celebrates someone's achievement that makes the whole process feel meaningful.
Recipe FAQs
- → What ingredients provide the buttery texture in these cookies?
Unsalted butter combined with granulated sugar creates a light, tender cookie base with a rich buttery flavor.
- → How is the royal icing made smooth and glossy?
Beating egg whites or meringue powder with sifted powdered sugar until stiff peaks form results in glossy, smooth royal icing.
- → What is the best way to ensure sharp cookie shapes after baking?
Chilling the dough before rolling and cutting helps maintain crisp outlines during baking.
- → How can I achieve the traditional graduation cap colors in decoration?
Use black gel food coloring for the main icing and yellow for tassels to mimic classic graduation cap colors.
- → Can these cookies be prepared in advance?
Yes, cookies can be baked up to two days ahead and decorated the next day for optimal freshness.